The first common mistake is measuring over a different liner or not using one at all. This can create a multitude of problems. All liners are not created equally. For example, 3mm uniform lines from various manufacturers are produced with a different fade into the distal umbrella. Some liners have a soft tissue matrix to control distal elongation. Depending on the type of matrix, the shape and size of the limb will be altered, especially in larger volume residual limbs. Scaling from a 6mm liner that was handy at the time for measurements to 3mm modifications creates inherent errors in managing limb volume and overall fit of the prosthetic socket. If the definitive liner is not available at the initial evaluation, take bare residuum measurements for proper ordering of the liner, and have the correct definitive liner available for the check socket measurement appointment.
Our bodies are dynamic. Fluctuation within the residuum is a normal and not an occasional process. Set up the measurement appointment at a time when the process can be repeated during the check socket fitting. Be aware if the patient is having hemodialysis treatments. Decide if a snug or loose fit is warranted. If a snug fit is desired measure on the day after hemodialysis treatment and fit on a day when limb volume is largest. This will enhance the patient’s ability to don the prosthesis on days when the limb is at its biggest size. A 1-ply fit should be the goal on larger limb days. If a loose fit is more appropriate, measure on larger limb day and fit on a smaller limb day. Evaluate how many socks will be needed after treatment. A 5-ply fit is recommended as anything more could cause socket issues. These are guidelines and each clinician may have their own method. Consistent clinical methods and detailed fabrication instructions will produce consistent and high-quality prosthetic designs.
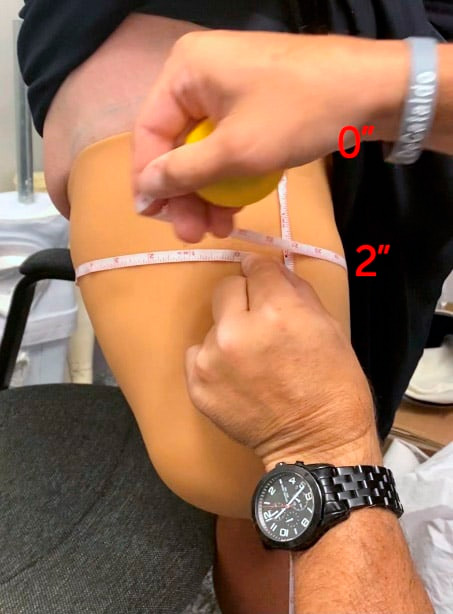
It is critical that measurements are taken at the same level that corresponds to the same position on the CAD template. The zero level in CAD is defined as the most proximal measurement closest to the perineum that remains perpendicular to the center bisection of the limb. Keep the tape measure horizontal and parallel to the floor for all circumferential measurements as any angulation will likely increase the circumference measurement.
Measurement tension is also important. A true anatomical circumference is taken with zero compression. Measure in this manner if the liner manufacturers full reduction recommendation of “to the touch” will be used. There are many variables to consider when reducing the socket measurements. Orthomerica designs with a “pin fit” CTM. Both the “to the touch” and max tension measurements should be documented. The max tension measurement should be close to a 5% reduction. If the patient has a firm limb, there will likely be a 3% reduction.
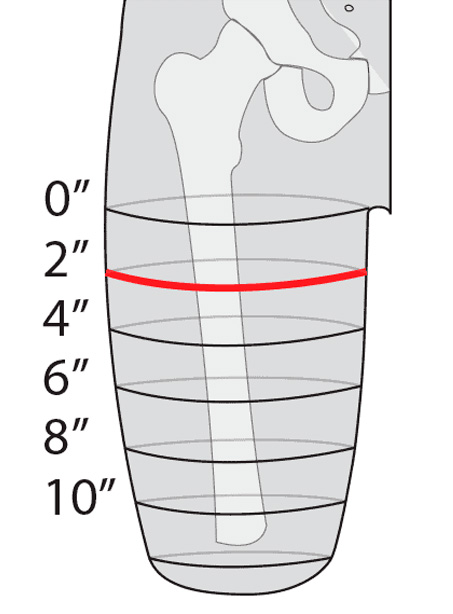
Proper spacing of measurements should be consistent over the limb. The most common increment for TF CTM is every 2” (refer to figure 1). CAD software will ask for a spacing of measurements. To obtain an accurate check socket, measurements should coincide with where CAD applies the measurement (refer to figure 2).


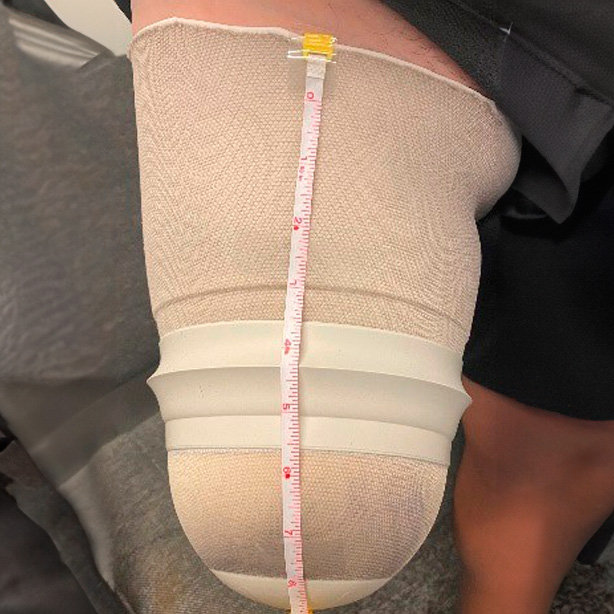
When measuring the ischium to distal end, it’s best to use a transfemoral length gauge (refer to figure 3). Take care to identify the ischial tuberosity accurately and compress the distal tissue only slightly. Remember, measure twice cut once! Remove the length gauge, let the patient relax and double check the length measurement. If the patient contracts their gluteus maximus and/or hamstrings, the measurement will be shorter. It’s better to have a mildly long check socket than one that is too short. A long socket will allow all proximal structures into the brim of the socket and allows the clinician to confirm good ischial containment with a lateral pull test. If the socket is short, the ischial tuberosity will be out of the socket.
Provide a picture of the residual limb with a tape measure taped to the anterior surface. Set the zero of tape at the zero-measurement position. Take the picture from 18” to 24” away, keeping the camera parallel to the limb. This will allow the technical team to properly shape the distal end of the limb, and also determine where the ring seal will fall relative to where the measurements were taken and to requested modification reductions.
Following these simple tips will dramatically improve the fit and function of the CTM sockets. As always, please feel free to call for clinical support and consultation, and to discuss all the possibilities and socket designs available. Orthomerica is ready to be your O&P partner!
Vincent DeCataldo, BOCPO, NJLPO
Prosthetics Products Manager

It is critical that measurements are taken at the same level that corresponds to the same position on the CAD template. The zero level in CAD is defined as the most proximal measurement closest to the perineum that remains perpendicular to the center bisection of the limb. Keep the tape measure horizontal and parallel to the floor for all circumferential measurements as any angulation will likely increase the circumference measurement.
Measurement tension is also important. A true anatomical circumference is taken with zero compression. Measure in this manner if the liner manufacturers full reduction recommendation of “to the touch” will be used. There are many variables to consider when reducing the socket measurements. Orthomerica designs with a “pin fit” CTM. Both the “to the touch” and max tension measurements should be documented. The max tension measurement should be close to a 5% reduction. If the patient has a firm limb, there will likely be a 3% reduction.
Proper spacing of measurements should be consistent over the limb. The most common increment for TF CTM is every 2” (refer to figure 1). CAD software will ask for a spacing of measurements. To obtain an accurate check socket, measurements should coincide with where CAD applies the measurement (refer to figure 2).
When measuring the ischium to distal end, it’s best to use a transfemoral length gauge (refer to figure 3). Take care to identify the ischial tuberosity accurately and compress the distal tissue only slightly. Remember, measure twice cut once! Remove the length gauge, let the patient relax and double check the length measurement. If the patient contracts their gluteus maximus and/or hamstrings, the measurement will be shorter. It’s better to have a mildly long check socket than one that is too short. A long socket will allow all proximal structures into the brim of the socket and allows the clinician to confirm good ischial containment with a lateral pull test. If the socket is short, the ischial tuberosity will be out of the socket.
Provide a picture of the residual limb with a tape measure taped to the anterior surface. Set the zero of tape at the zero-measurement position. Take the picture from 18” to 24” away, keeping the camera parallel to the limb. This will allow the technical team to properly shape the distal end of the limb, and also determine where the ring seal will fall relative to where the measurements were taken and to requested modification reductions.
Following these simple tips will dramatically improve the fit and function of the CTM sockets. As always, please feel free to call for clinical support and consultation, and to discuss all the possibilities and socket designs available. Orthomerica is ready to be your O&P partner!
Use this field to search within a specific product category.